 Pin This
 Every Fourth of July, my kitchen fills with the smell of melting butter and graham crackers, but it wasn't until a sweltering afternoon in 2019 when my neighbor challenged me to bring something other than potato salad that I discovered the magic of no-bake cheesecake. I was frantically flipping through my phone while the grill was already heating up outside, desperate for something that wouldn't heat up my kitchen further. That's when it hit me—why not make the cake itself look like the flag? Within minutes, I had cream cheese softening on the counter and berries arranged in patriotic rows, and somehow this last-minute idea became the dessert everyone asks about now.
I'll never forget pulling this cake out of the fridge at my neighbor's house that first time, and watching people's faces light up when they realized the design wasn't store-bought or overly complicated—just fresh berries arranged with intention. My friend Sarah actually took a photo before serving it, and that simple moment of pride in something I'd thrown together so quickly reminded me that the best recipes are sometimes the ones born from a little bit of panic.
Ingredients
- Graham cracker crumbs: The foundation that holds everything together, and trust me, crushing them yourself makes them fresher and more flavorful than store-bought.
- Unsalted butter, melted: This binds the crust into something sturdy enough to hold up under the weight of cream and berries without falling apart.
- Granulated sugar and salt: These tiny amounts make the crust taste less like cardboard and more like an intentional dessert.
- Cream cheese, softened: This is non-negotiable—cold cream cheese will never blend smoothly, so leave it on the counter and be patient with it.
- Heavy whipping cream, cold: Keep this in the coldest part of your fridge before whipping; it makes the filling light and cloud-like instead of dense.
- Powdered sugar: Granulated sugar won't dissolve evenly, so don't be tempted to substitute.
- Vanilla extract and lemon zest: The vanilla is the backbone of flavor, while lemon zest (if using) adds brightness that keeps the whole thing from tasting too heavy.
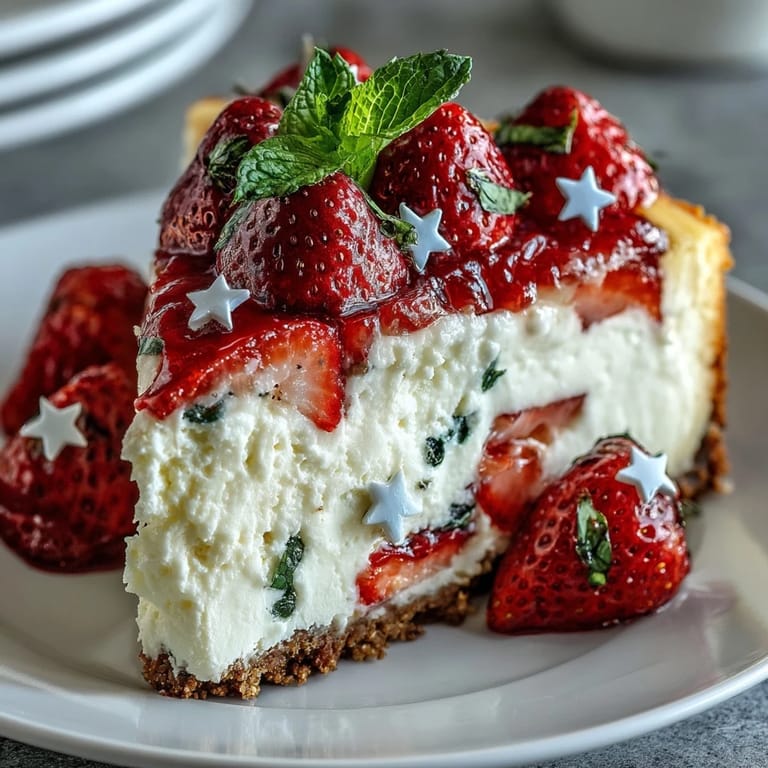
- Fresh blueberries, strawberries, and raspberries: Choose berries that are firm and dry; wet berries will make your flag look sad after a few hours.
Tired of Takeout? 🥡
Get 10 meals you can make faster than delivery arrives. Seriously.
One email. No spam. Unsubscribe anytime.
Instructions
- Build your foundation:
- Combine the graham cracker crumbs, melted butter, sugar, and salt in a bowl until it looks like damp sand. Press this mixture firmly into the bottom of your baking dish—don't be shy about using your palms to really pack it down so it holds together.
- Chill and prepare:
- Pop the crust into the fridge while you work on the filling; this keeps it firm and prevents it from getting soggy later.
- Blend the cream cheese:
- Beat the softened cream cheese until it's completely smooth and creamy, with no little lumps hiding anywhere. This usually takes about 2 minutes of steady mixing.
- Add sweetness and flavor:
- Mix in the powdered sugar, vanilla extract, and lemon zest if you're using it, beating until everything is incorporated and the mixture is pale and fluffy.
- Whip and fold:
- In a separate bowl, whip the cold heavy cream to stiff peaks—this means when you lift the whisk, the peaks should stand straight up without flopping over. Gently fold this whipped cream into the cream cheese mixture with a spatula, being careful not to deflate all those air bubbles you just worked to create.
- Spread and smooth:
- Spread the filling evenly over your chilled crust and smooth the top with a spatula until it's level and looks intentional. This is where patience pays off.
- Create the star section:
- Arrange your blueberries in the upper left corner of the rectangle to represent the stars on the flag. They should be snug together but not crushing each other.
- Make the stripes:
- Lay down rows of strawberry slices across the cake, alternating with rows of plain filling (or raspberries if you want extra red). This is where the magic happens and your cake actually starts looking like the flag.
- Optional piping:
- If you want the stripes to be extra defined, pipe whipped cream between the rows using a pastry bag, which adds a nice visual touch and a little extra creaminess.
- Chill and set:
- Cover the cake and refrigerate for at least 4 hours, preferably overnight, until the filling is completely set and firm enough to slice cleanly.
- Slice and serve:
- Cut into 12 pieces and serve straight from the fridge; this cake is best enjoyed cold and should be eaten within a day or two of decorating.
 Pin This
 There's something about a dessert that looks like art but tastes like pure comfort that makes people actually slow down and appreciate it. I've since learned that this cake has become the thing my family expects on the Fourth of July, which is funny because it was born from pure desperation and a neighbor's dare.
The Beauty of No-Bake Desserts
The no-bake approach isn't just about staying cool on a hot day; it's about giving yourself permission to make something special without the stress. I've made this cake for picnics, backyard parties, and potlucks, and every single time, it arrives looking pristine because it wasn't jostled around in a hot oven or transported while still warm. The texture stays perfect from the moment you slice it, which is something you can't always say about traditional baked cheesecakes that crack if you even look at them the wrong way.
Berry Selection and Prep
The success of this cake really hinges on choosing berries that are fresh and dry, which means shopping the day before or the morning of your celebration. I learned this the hard way when I bought pre-sliced strawberries the day before and ended up with a soggy mess because they released their juice into my beautiful cake. Now I slice them fresh, right before decorating, and I pat them dry with a paper towel to remove any surface moisture.
Make-Ahead Magic and Timing Tips
This is genuinely one of those recipes where planning ahead makes your life easier instead of harder. You can make the entire cake up to 24 hours in advance, keep it covered in the fridge, and then add your berry decoration just before serving or within an hour of it. This approach means you're not stressed on the day of the party, and the cake has time to firm up completely, making it easier to slice into those clean, perfect portions that make everyone think you're a dessert genius.
- Prepare the crust and filling the night before, then decorate with berries on party day for the freshest appearance.
- If your kitchen is especially warm, you can set the entire cake on a cold pack in a cooler during transport to keep it firm.
- Don't forget to pull it out of the fridge about 10 minutes before serving so the flavors aren't muted by being too cold.
 Pin This
 This cake has quietly become my answer to the question of what to bring to summer gatherings, and I think that's because it asks for very little and delivers so much. It's a cake that tastes like celebration, looks like you tried really hard, and is actually easier to make than you'd think.
Recipe Q&A
- → How long should the dessert chill before serving?
It needs to chill in the refrigerator for at least 4 hours to firm up the filling and set the layers.
- → Can I substitute the crust with a gluten-free option?
Yes, using gluten-free graham crackers creates a gluten-free crust without affecting the texture much.
- → What’s the best way to achieve the flag design?
Arrange blueberries in the upper left corner as stars and alternate sliced strawberries and raspberries with filling to form stripes.
- → Can I prepare this dessert in advance?
Yes, it can be made up to 24 hours ahead. Add fresh fruit topping just before serving for optimal freshness.
- → Is whipped cream necessary in the filling?
Whipped cream lightens the cream cheese mixture, creating a smooth and fluffy texture integral to the filling.