 Pin This
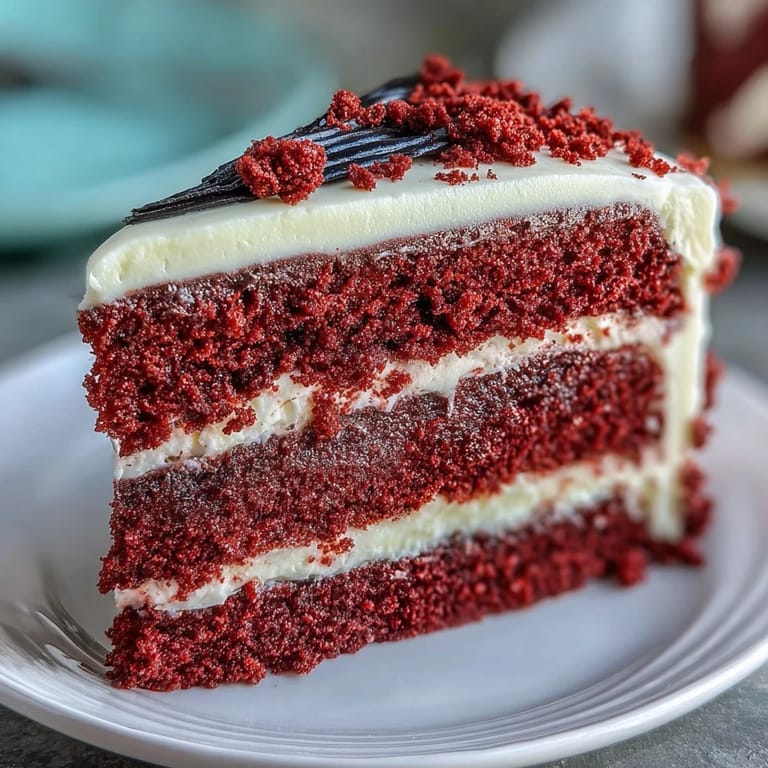
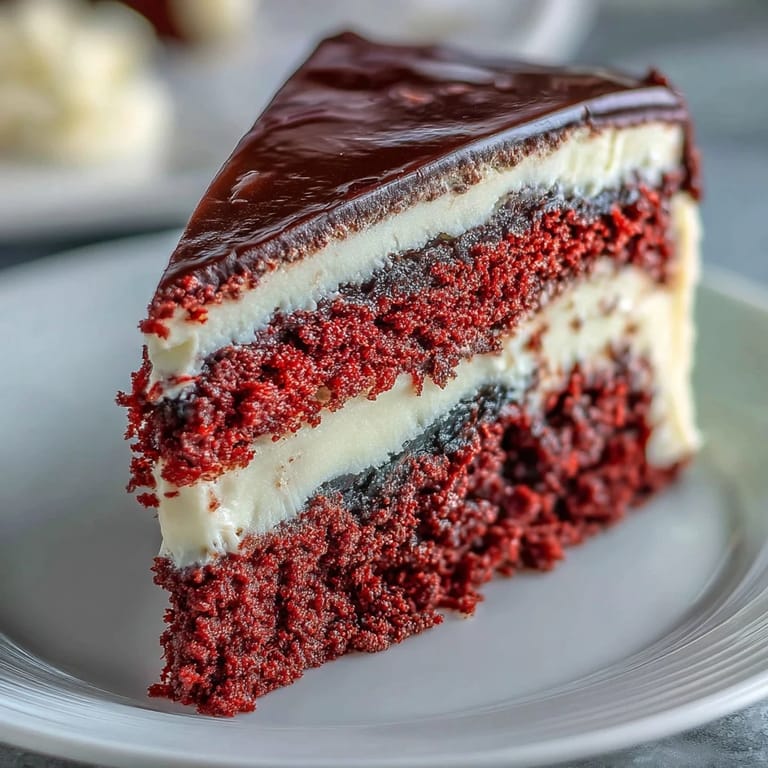
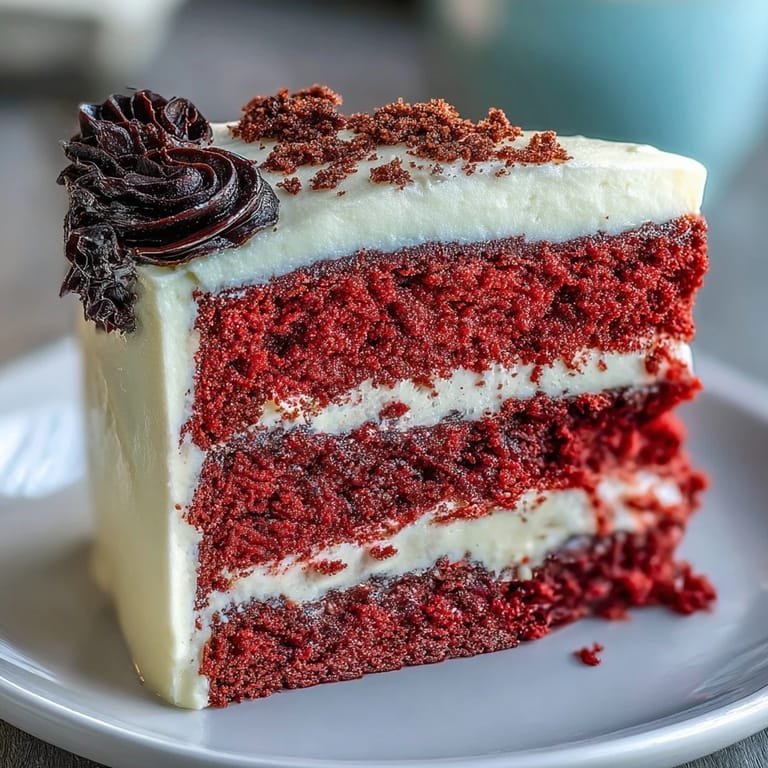
 The first time I attempted a Betty Boop cake, I spent three hours just getting her eyelashes right. My kitchen looked like a crime scene with black food coloring everywhere, but when I finally stepped back and saw that iconic silhouette winking back at me, I actually laughed out loud. Sometimes the most technically frustrating baking projects end up being the ones that bring the most joy. This red velvet beauty has since become my go to for friends who need something spectacular.
I made this for my best friends thirtieth birthday party last winter. She had this vintage Betty Boop collection in her college apartment that wed spent hours laughing over, so when everyone gathered around the dessert table and started pointing and reminiscing, I knew I had nailed more than just the flavor profile. Food has this magical way of weaving itself into our shared histories.
Ingredients
- 2 cups all purpose flour: The backbone of your tender crumb, measure by weight if you can for consistent results
- 1 ½ cups granulated sugar: Sweetness and structure, cream this thoroughly with butter for that airy velvet texture
- 2 teaspoons baking powder: Gives your cake lift without affecting that gorgeous red color
- ½ teaspoon salt: Essential for balancing sweetness and enhancing all flavors
- ½ cup unsalted butter: Room temperature is non negotiable here, cold butter will not incorporate properly
- 2 large eggs: Also at room temperature, they emulsify better and create a more uniform batter
- ¾ cup whole milk: Adds richness and moisture, the fat content really matters in velvet cakes
- 2 teaspoons vanilla extract: Pure extract makes a noticeable difference in the final flavor
- 1 tablespoon red gel food coloring: Gel is much more concentrated than liquid, start with less and add until you achieve that deep cartoon red
- 8 ounces cream cheese: Use full fat brick style, not tub spread, for the most stable frosting
- ½ cup unsalted butter: Again, room temperature so it blends seamlessly with the cream cheese
- 4 cups powdered sugar: Sifting first prevents lumps and makes for silkier buttercream
- 8 ounces black fondant: Knead thoroughly before rolling, this will be Bettys signature hair
- 4 ounces white fondant: For her expressive eyes, keep this portion covered when not working with it
- 2 ounces red fondant: Those iconic lips need just a small amount, you can use scraps from other projects
- 1 teaspoon edible pearl dust: Optional but adds such a gorgeous cartoon shine to the eyes and lips
Tired of Takeout? 🥡
Get 10 meals you can make faster than delivery arrives. Seriously.
One email. No spam. Unsubscribe anytime.
Instructions
- Preheat and prepare your pans:
- Set your oven to 350 degrees and grease two 8 inch round pans thoroughly, lining the bottoms with parchment paper for guaranteed easy release
- Whisk the dry ingredients:
- Combine flour, baking powder, and salt in a medium bowl, whisking to ensure everything is evenly distributed
- Cream butter and sugar:
- Beat butter and sugar on medium speed for about 3 minutes until the mixture looks pale and fluffy, this creates air pockets that make the cake tender
- Add eggs and vanilla:
- Drop in eggs one at a time, letting each fully incorporate before adding the next, then mix in the vanilla
- Combine wet and dry:
- Alternately add flour mixture and milk in three additions, starting and ending with flour, and scrape down the bowl to catch any pockets of unmixed batter
- Add the signature red color:
- Mix in red gel food coloring until the batter is uniformly deep red, remember that it will bake slightly darker
- Bake to perfection:
- Divide batter between prepared pans and bake for 25 to 30 minutes, rotating halfway through, until a toothpick comes out clean
- Cool completely:
- Let cakes rest in pans for 10 minutes then invert onto wire racks, they must be fully cool before frosting or the buttercream will melt
- Make the buttercream:
- Beat cream cheese and butter until smooth, about 2 minutes, then gradually add powdered sugar beating until light and fluffy
- Level and stack:
- Trim cake domes level with a serrated knife, place one layer on the cake board, spread buttercream on top, then add the second layer
- Apply crumb coat:
- Frost the entire cake with a thin layer of buttercream and chill for 20 minutes to lock in crumbs
- Final frosting layer:
- Apply a thicker coat of buttercream and smooth sides and top with a cake scraper or offset spatula
- Create the fondant hair:
- Roll black fondant to 1/8 inch thickness on a cornstarch dusted surface and cut out Betty Boops hair silhouette using a template
- Make facial features:
- Roll white fondant for eyes and small hearts for highlights, red fondant for lips, and optionally dust with pearl dust for shine
- Assemble the face:
- Once the cake is chilled and frosting firm, drape the black fondant hair over the front and attach eyes and lips with small dabs of buttercream
- Add final details:
- Use extra black fondant for eyelashes and eyebrows, optionally add a red fondant headband, and let the cake rest for 30 minutes before serving
 Pin This
 The moment someone recognized the cake across the room and shouted Oh my god, is that Betty Boop I felt that particular rush that comes from nailing a vision. But what really got me was watching my friend carefully cut those perfect slices, revealing that stunning red velvet against the cream cheese frosting like she was preserving a tiny piece of art.
Working With Fondant
Fondant can feel intimidating but it is surprisingly forgiving once you understand its personality. Keep unused portions tightly wrapped in plastic or they will dry out and crack, work quickly but confidently, and remember that small imperfections can often be smoothed with a bit of shortening on your fingertips. The warmth of your hands will soften it, so take breaks if you feel it getting too sticky.
Achieving That Cartoon Red
Getting the perfect red velvet color is part science and part artistry. Gel coloring is much more concentrated than liquid, which means you can achieve that deep cartoon red without thinning your batter. Start with less than you think you need, you can always add more but you cannot take it back. The color will deepen slightly during baking, so aim for a shade or two lighter than your final vision.
Making It Your Own
This cake template works beautifully for other cartoon characters or even simple graphic designs. Practice your fondant shapes on parchment paper before committing to the cake, and remember that imperfectly charming often reads better than technically perfect. The red velvet and cream cheese combination is classic enough that the flavor will always shine, even if your fondant work takes a few tries to master.
- Work with fondant in a cool room, heat makes it too soft and difficult to manage
- Keep a small bowl of water nearby for sealing fondant seams and attaching pieces
- Practice Betty Boops signature shapes on wax paper before moving to the actual cake
 Pin This
 There is something wonderfully retro about serving a Betty Boop cake in the age of Instagram desserts. It feels like a little wink to a different era, both in flavor and style, and honestly that is exactly the kind of baking worth sharing.
Recipe Q&A
- → Can I make the cake layers ahead of time?
Yes, you can bake the cake layers up to 2 days in advance. Wrap them tightly in plastic wrap and store at room temperature, or freeze for up to 1 month. Thaw completely before assembling and frosting.
- → What if I don't have red gel food coloring?
Liquid food coloring can be used, but gel coloring provides more vibrant, deeper color without altering batter consistency. You may need more liquid coloring to achieve the same rich red hue.
- → How do I prevent fondant from cracking?
Knead fondant until pliable before rolling, and work on a surface dusted with cornstarch. Roll to an even 1/8-inch thickness and handle gently when transferring. If cracks appear, smooth them with your fingertips.
- → Can I use store-bought frosting instead?
While homemade cream cheese buttercream offers the best flavor and texture, store-bought can work in a pinch. Choose a cream cheese variety and beat it with softened butter to improve consistency and richness.
- → How should I store the finished cake?
Store the decorated cake in the refrigerator for up to 3 days, covered loosely with plastic wrap or in a cake box. Bring to room temperature 30 minutes before serving for the best texture and flavor.
- → Do I need special tools for fondant work?
A rolling pin and sharp knife are sufficient for basic fondant decorating. Fondant smoothers, cutters, and modeling tools make detailed work easier but are not required for this design.